A technical guide on setting up and using Amazon ECS for scalable containerized applications.
Set up to use Amazon ECS
If you’ve already signed up for Amazon Web Services (AWS) and have been using Amazon Elastic Compute Cloud (Amazon EC2), you are close to being able to use Amazon ECS. The set-up process for the two services is similar. The following guide prepares you for launching your first Amazon ECS cluster.
Complete the following tasks to get set up for Amazon ECS.
Sign up for an AWS account
If you do not have an AWS account, complete the following steps to create one.
To sign up for an AWS account
- Open https://portal.aws.amazon.com/billing/signup.
- Follow the online instructions.
Part of the sign-up procedure involves receiving a phone call and entering a verification code on the phone keypad. When you sign up for an AWS account, an AWS account root user is created. The root user has access to all AWS services and resources in the account. As a security best practice, assign administrative access to a user, and use only the root user to perform tasks that require root user access.
AWS sends you a confirmation email after the sign-up process is complete. At any time, you can view your current account activity and manage your account by going to https://aws.amazon.com/ and choosing My Account.
Create a user with administrative access
After you sign up for an AWS account, secure your AWS account root user, enable AWS IAM Identity Center, and create an administrative user so that you don’t use the root user for everyday tasks.
Secure your AWS account root user
- Sign in to the AWS Management Consoleas the account owner by choosing Root user and entering your AWS account email address. On the next page, enter your password. For help signing in by using root user, see Signing in as the root user in the AWS Sign-In User Guide.
- Turn on multi-factor authentication (MFA) for your root user. For instructions, see Enable a virtual MFA device for your AWS account root user (console) in the IAM User Guide.
Create a user with administrative access
- Enable IAM Identity Center. For instructions, see Enabling AWS IAM Identity Center in the AWS IAM Identity Center User Guide.
- In IAM Identity Center, grant administrative access to a user. For a tutorial about using the IAM Identity Center directory as your identity source, see Configure user access with the default IAM Identity Center directory in the AWS IAM Identity Center User Guide.
Sign in as the user with administrative access
- To sign in with your IAM Identity Center user, use the sign-in URL that was sent to your email address when you created the IAM Identity Center user. For help signing in using an IAM Identity Center user, see Signing in to the AWS access portal in the AWS Sign-In User Guide.
Assign access to additional users
- In IAM Identity Center, create a permission set that follows the best practice of applying least-privilege permissions. For instructions, see Create a permission set in the AWS IAM Identity Center User Guide.
- Assign users to a group, and then assign single sign-on access to the group. For instructions, see Add groups in the AWS IAM Identity Center User Guide.
Create a virtual private cloud
You can use Amazon Virtual Private Cloud (Amazon VPC) to launch AWS resources into a virtual network that you’ve defined. We strongly suggest that you launch your container instances in a VPC.
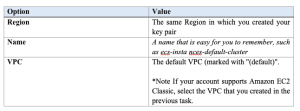
If you have a default VPC, you can skip this section and move to the next task, Create a security group. To determine whether you have a default VPC, see Supported Platforms in the Amazon EC2 Consolein the Amazon EC2 User Guide. Otherwise, you can create a nondefault VPC in your account using the steps below.
For information about how to create a VPC, see Create a VPC only in the Amazon VPC User Guide, and use the following table to determine what options to select.

For more information about Amazon VPC, see What is Amazon VPC? in the Amazon VPC User Guide.
Create a security group
Security groups act as a firewall for associated container instances, controlling both inbound and outbound traffic at the container instance level. You can add rules to a security group that enable you to connect to your container instance from your IP address using SSH. You can also add rules that allow inbound and outbound HTTP and HTTPS access from anywhere. Add any rules to open ports that are required by your tasks. Container instances require external network access to communicate with the Amazon ECS service endpoint.
If you plan to launch container instances in multiple Regions, you need to create a security group in each Region. For more information, see Regions and Availability Zones in the Amazon EC2 User Guide.
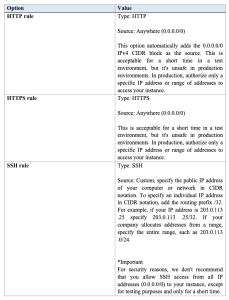
For information about how to create a security group, see Create a security group in the Amazon EC2 User Guide and use the following table to determine what options to select.

For information about the outbound rules to add for your use cases, see Security group rules for different use cases in the Amazon EC2 User Guide.
Amazon ECS container instances do not require any inbound ports to be open. However, you might want to add an SSH rule so you can log into the container instance and examine the tasks with Docker commands. You can also add rules for HTTP and HTTPS if you want your container instance to host a task that runs a web server. Container instances do require external network access to communicate with the Amazon ECS service endpoint. Complete the following steps to add these optional security group rules.
Add the following three inbound rules to your security group.For information about how to create a security group, see Add rules to your security group in the Amazon EC2 User Guide.

Create the credentials to connect to your EC2 instance
For Amazon ECS, a key pair is only needed if you intend on using the EC2 launch type.
AWS uses public-key cryptography to secure the login information for your instance. A Linux instance, such as an Amazon ECS container instance, has no password to use for SSH access. You use a key pair to log in to your instance securely. You specify the name of the key pair when you launch your container instance, then provide the private key when you log in using SSH.
If you haven’t created a key pair already, you can create one using the Amazon EC2 console. If you plan to launch instances in multiple regions, you’ll need to create a key pair in each region. For more information about regions, see Regions and Availability Zones in the Amazon EC2 User Guide.
To create a key pair
Use the Amazon EC2 console to create a key pair. For more information about creating a key pair, see Create a key pair in the Amazon EC2 User Guide. For information about how to connect to your instance, see Connect to your Linux instance in the Amazon EC2 User Guide.
Install the AWS CLI
The AWS Management Console can be used to manage all operations manually with Amazon ECS. However, you can install the AWS CLI on your local desktop or a developer box so that you can build scripts that can automate common management tasks in Amazon ECS.
To use the AWS CLI with Amazon ECS, install the latest AWS CLI version. For information about installing the AWS CLI or upgrading it to the latest version, see Installing the AWS Command Line Interface in the AWS Command Line Interface User Guide.
Credit to: AWS Documentation


