In this topic, you set up replication between the source and target databases.
Step 1: Create a replication instance using the AWS DMS console
To start work with AWS DMS, create a replication instance.
A replication instance performs the actual data migration between source and target endpoints. Your instance needs enough storage and processing power to perform the tasks that migrate data from your source database to your target database. How large this replication instance should be depends on the amount of data to migrate and the tasks your instance needs to do. For more information about replication instances, see Working with an AWS DMS replication instance.
To create a replication instance using the console
1. Sign in to the AWS Management Console and open the AWS DMS console at https://console.aws.amazon.com/dms/v2/
2. On the navigation pane, choose Replication instances, and then choose Create replication instance.
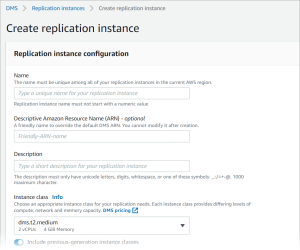
3. On the Create replication instance page, specify your replication instance configuration:
- For Name, enter DMS-instance.
- For Description, enter a short description for your replication instance (optional).
- For Instance class, leave dms.t3.medium chosen.
The instance needs enough storage, networking, and processing power for your migration. For more information about how to choose an instance class, see Choosing the right AWS DMS replication instance for your migration. - For Engine version, accept the default.
- For Multi AZ, choose Dev or test workload (Single-AZ).
- For Allocated storage (GiB), accept the default of 50 GiB.
In AWS DMS, storage is mostly used by log files and cached transactions. For cache transactions, storage is used only when the cached transactions need to be written to disk. As a result, AWS DMS doesn’t use a significant amount of storage. - For Network type choose IPv4.
- For VPC, choose DMSVPC
- For Replication subnet group, leave the replication subnet group currently chosen.
- Clear Publicly accessible.
4. Choose the Advanced security and network configuration tab to set values for network and encryption settings if you need them:
- For Availability zone, choose us-west-2a.
- For VPC security group(s), choose the Default security group if it isn’t already chosen.
- For AWS KMS key, leave (Default) aws/dms chosen.
5. Leave the settings on the Maintenance tab as they are. The default is a 30-minute window selected at random from an 8-hour block of time for each AWS Region, occurring on a random day of the week.
6. Choose Create.
AWS DMS creates a replication instance to perform your migration.
Step 2: Specify source and target endpoints
While your replication instance is being created, you can specify the source and target data store endpoints for the Amazon RDS databases you created previously. You create each endpoint separately.
To specify a source endpoint and database endpoint using the AWS DMS console
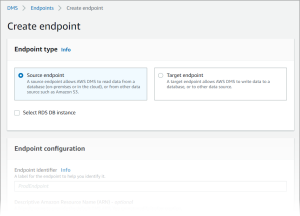
1. On the console, choose Endpoints from the navigation pane and then choose Create Endpoint.
2. On the Create endpoint page, choose the Source endpoint type. Select the Select RDS DB instance box, and choose the dms–mariadb instance
3. In the Endpoint configuration section, enter dms-mysql-source for Endpoint identifier.
4. For Source engine, leave MySQL chosen.
5. For Access to endpoint database, choose Provide access information manually. Verify that the Port, Secure Socket Layer (SSL) mode, User name, and Password are correct
6. Choose the Test endpoint connection (optional) tab. For VPC, choose DMSVPC.
7. For Replication instance, leave dms-instance chosen.
8. Choose Run test.
After you choose Run test, AWS DMS creates the endpoint with the details that you provided and connects to it. If the connection fails, edit the endpoint definition and test the connection again. You can also delete the endpoint manually.
9. After you have a successful test, choose Create endpoint.
10. Specify a target database endpoint using the AWS DMS console. To do this, repeat the steps preceding, with the following settings:
- Endpoint type: Target endpoint
- RDS Instance: dms-postgresql
- Endpoint identifier: dms-postgresql-target
- Target engine: Leave PostgreSQL chosen.
When you’re finished providing all information for your endpoints, AWS DMS creates your source and target endpoints for use during database migration
Step 3: Create a task and migrate data
In this step, you create a task to migrate data between the databases you created.
To create a migration task and start your database migration
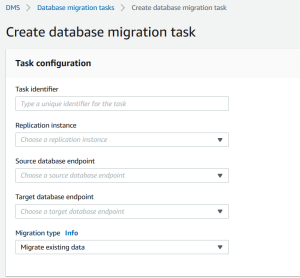
1. In the console navigation pane, choose Database migration tasks, and then choose Create task. The Create database migration task page opens.
2. In the Task configuration section, specify the following task options:
- Task identifier: Enter dms-task.
- Replication instance: Choose your replication instance (dms-instance-vpc-<vpc id>
- Source database endpoint: Choose dms-mysql-source.
- Target database endpoint: Choose dms-postgresql-target.
- Migration type: Choose Migrate existing data and replicate on-going changes.
3. Choose the Task settings tab. Set the following settings:
- Target table preparation mode: Do nothing
- Stop task after full load completes: Don’t stop
4. Choose the Table mappings tab, and expand Selection rules. Choose Add new selection rule. Set the following settings:
- Schema: Enter a schema
- Schema name: dms_sample
5. Choose the Migration task startup configuration tab, and then choose Automatically on create.
6. Choose Create task.
AWS DMS then creates the migration task and starts it. The initial database replication takes about 10 minutes. Make sure to do the next step in the tutorial before AWS DMS finishes migrating the data.
Step 4: Test replication
In this section, you insert data into the source database during and after initial replication, and query the target database for the inserted data.
To test replication
1. Make sure that your database migration task shows a status of Running but your initial database replication, started in the previous step, isn’t complete.
2. Connect to your Amazon EC2 client, and start the MySQL client with the following command. Provide your MySQL database endpoint.
mysql -h dms-mysql.abcdefg12345.us-west-2.rds.amazonaws.com -P 3306 -u admin -pchangeit dms_sample
3. Run the following command to insert a record into the source database.
MySQL [dms_sample]> insert person (full_name, last_name, first_name) VALUES (‘Test User1’, ‘User1’, ‘Test’); Query OK, 1 row affected (0.00 sec)
4. Exit the MySQL client.
MySQL [dms_sample]> exit
Bye
5. Before replication completes, query the target database for the new record.
From the Amazon EC2 instance, connect to the target database using the following command, providing your target database endpoint.
psql \ –host=dms-postgresql.abcdefg12345.us-west-2.rds.amazonaws.com \ –port=5432 \ –username=postgres \ –password \ –dbname=dms_sample
Provide the password (changeit) when prompted.
6. Before replication completes, query the target database for the new record.
dms_sample=> select * from dms_sample.person where first_name = ‘Test’; id | full_name | last_name | first_name —-+———–+———–+———— (0 rows)
7. While your migration task is running, you can monitor the progress of your database migration as it happens:
- In the DMS console navigation pane, choose Database migration tasks.
- Choose dms-task.
- Choose Table statistics.
For more information about monitoring, see Monitoring AWS DMS tasks.
8. After replication completes, query the target database again for the new record. AWS DMS migrates the new record after initial replication completes.
dms_sample=> select * from dms_sample.person where first_name = ‘Test’; id | full_name | last_name | first_name ———+————+———–+———— 7077784 | Test User1 | User1 | Test (1 row)
9. Exit the psql client.
dms_sample=> quit
10. Repeat step 1 to connect to the source database again.
11. Insert another record into the person table.
MySQL [dms_sample]> insert person (full_name, last_name, first_name) VALUES (‘Test User2’, ‘User2’, ‘Test’); Query OK, 1 row affected (0.00 sec)
12. Repeat steps 3 and 4 to disconnect from the source database and connect to the target database.
13. Query the target database for the replicated data again.
dms_sample=> select * from dms_sample.person where first_name = ‘Test’; id | full_name | last_name | first_name ———+————+———–+———— 7077784 | Test User1 | User1 | Test 7077785 | Test User2 | User2 | Test (2 rows)
Step 5: Clean up AWS DMS resources
After you complete the getting started tutorial, you can delete the resources you created. You can use the AWS console to remove them. Make sure to delete the migration tasks before deleting the replication instance and endpoints.
To delete a migration task using the console
- On the AWS DMS console navigation pane, choose Database migration tasks.
- Choose dms-task.
- Choose Actions, Delete.
To delete a replication instance using the console
- On the AWS DMS console navigation pane, choose Replication instances.
- Choose DMS-instance.
- Choose Actions, Delete.
AWS DMS deletes the replication instance and removes it from the Replication instances page.
To remove endpoints using the console
- On the AWS DMS console navigation pane, choose Endpoints.
- Choose dms-mysql-source.
- Choose Actions, Delete.
After you delete your AWS DMS resources, make sure also to delete the following resources. For help with deleting resources in other services, see each service’s documentation.
- Your RDS databases.
- Your RDS database parameter groups.
- Your RDS subnet groups.
- Any Amazon CloudWatch logs that were created along with your databases and replication instance.
- Security groups that were created for your Amazon VPC and Amazon EC2 client. Make sure to remove the inbound rule from Default for the launch-wizard-1 security groups, which is necessary for you to be able delete them.
- Your Amazon EC2 client.
- Your Amazon VPC.
- Your Amazon EC2 key pair for your Amazon EC2 client.
Credit to: AWS Documentation