
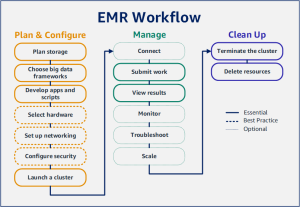
With Amazon EMR you can set up a cluster to process and analyze data with big data frameworks in just a few minutes. This tutorial shows you how to launch a sample cluster using Spark, and how to run a simple PySpark script stored in an Amazon S3 bucket. It covers essential Amazon EMR tasks in three main workflow categories: Plan and Configure, Manage, and Clean Up.
You’ll find links to more detailed topics as you work through the tutorial, and ideas for additional steps in the Next steps section. If you have questions or get stuck, contact the Amazon EMR team on our Discussion forum.
Prerequisites
- Before you launch an Amazon EMR cluster, make sure you complete the tasks in Setting up Amazon EMR.
Cost
- The sample cluster that you create runs in a live environment. The cluster accrues minimal charges. To avoid additional charges, make sure you complete the cleanup tasks in the last step of this tutorial. Charges accrue at the per-second rate according to Amazon EMR pricing. Charges also vary by Region. For more information, see Amazon EMR pricing.
- Minimal charges might accrue for small files that you store in Amazon S3. Some or all of the charges for Amazon S3 might be waived if you are within the usage limits of the AWS Free Tier. For more information, see Amazon S3 pricing and AWS Free Tier.
Step 1: Plan and configure an Amazon EMR cluster
Prepare storage for Amazon EMR
When you use Amazon EMR, you can choose from a variety of file systems to store input data, output data, and log files. In this tutorial, you use EMRFS to store data in an S3 bucket. EMRFS is an implementation of the Hadoop file system that lets you read and write regular files to Amazon S3. For more information, see Work with storage and file systems.
To create a bucket for this tutorial, follow the instructions in How do I create an S3 bucket? in the Amazon Simple Storage Service Console User Guide. Create the bucket in the same AWS Region where you plan to launch your Amazon EMR cluster. For example, US West (Oregon) us-west-2.
Buckets and folders that you use with Amazon EMR have the following limitations:
- Names can consist of lowercase letters, numbers, periods (.), and hyphens (-).
- Names cannot end in numbers.
- A bucket name must be unique across all AWS accounts.
- An output folder must be empty.
Prepare an application with input data for Amazon EMR
The most common way to prepare an application for Amazon EMR is to upload the application and its input data to Amazon S3. Then, when you submit work to your cluster you specify the Amazon S3 locations for your script and data.
In this step, you upload a sample PySpark script to your Amazon S3 bucket. We’ve provided a PySpark script for you to use. The script processes food establishment inspection data and returns a results file in your S3 bucket. The results file lists the top ten establishments with the most “Red” type violations.
You also upload sample input data to Amazon S3 for the PySpark script to process. The input data is a modified version of Health Department inspection results in King County, Washington, from 2006 to 2020. For more information, see King County Open Data: Food Establishment Inspection Data. Following are sample rows from the dataset.
name, inspection_result, inspection_closed_business, violation_type, violation_points
100 LB CLAM, Unsatisfactory, FALSE, BLUE, 5
100 PERCENT NUTRICION, Unsatisfactory, FALSE, BLUE, 5
7-ELEVEN #2361-39423A, Complete, FALSE, , 0
To prepare the example PySpark script for EMR
1. Copy the example code below into a new file in your editor of choice.
import argparsefrom pyspark.sql import SparkSessiondef calculate_red_violations(data_source, output_uri):“””Processes sample food establishment inspection data and queries the data to find the top 10 establishmentswith the most Red violations from 2006 to 2020.:param data_source: The URI of your food establishment data CSV, such as ‘s3://DOC-EXAMPLE-BUCKET/food-establishment-data.csv’.:param output_uri: The URI where output is written, such as ‘s3://DOC-EXAMPLE-BUCKET/restaurant_violation_results’.“””with SparkSession.builder.appName(“Calculate Red Health Violations”).getOrCreate() as spark:# Load the restaurant violation CSV dataif data_source is not None:restaurants_df = spark.read.option(“header”, “true”).csv(data_source)# Create an in-memory DataFrame to queryrestaurants_df.createOrReplaceTempView(“restaurant_violations”)# Create a DataFrame of the top 10 restaurants with the most Red violationstop_red_violation_restaurants = spark.sql(“””SELECT name, count(*) AS total_red_violationsFROM restaurant_violationsWHERE violation_type = ‘RED’GROUP BY nameORDER BY total_red_violations DESC LIMIT 10″””)# Write the results to the specified output URItop_red_violation_restaurants.write.option(“header”, “true”).mode(“overwrite”).csv(output_uri)if __name__ == “__main__”:parser = argparse.ArgumentParser()parser.add_argument(‘–data_source’, help=”The URI for you CSV restaurant data, like an S3 bucket location.”)parser.add_argument(‘–output_uri’, help=”The URI where output is saved, like an S3 bucket location.”)args = parser.parse_args()calculate_red_violations(args.data_source, args.output_uri)
2. Save the file as health_violations.py.
3. Upload health_violations.py to Amazon S3 into the bucket you created for this tutorial. For instructions, see Uploading an object to a bucket in the Amazon Simple Storage Service Getting Started Guide.
To prepare the sample input data for EMR
1. Download the zip file, food_establishment_data.zip.
2. Unzip and save food_establishment_data.zip as food_establishment_data.csv on your machine.
3. Upload the CSV file to the S3 bucket that you created for this tutorial. For instructions, see Uploading an object to a bucket in the Amazon Simple Storage Service Getting Started Guide.
For more information about setting up data for EMR, see Prepare input data.
Launch an Amazon EMR cluster
After you prepare a storage location and your application, you can launch a sample Amazon EMR cluster. In this step, you launch an Apache Spark cluster using the latest Amazon EMR release version.
1. Sign in to the AWS Management Console, and open the Amazon EMR console at https://console.aws.amazon.com/emr.
2. Under EMR on EC2 in the left navigation pane, choose Clusters, and then choose Create cluster.
3. On the Create Cluster page, note the default values for Release, Instance type, Number of instances, and Permissions. These fields automatically populate with values that work for general-purpose clusters.
4. In the Cluster name field, enter a unique cluster name to help you identify your cluster, such as My first cluster. Your cluster name can’t contain the characters <, >, $, |, or ` (backtick).
5. Under Applications, choose the Spark option to install Spark on your cluster.
6. Under Cluster logs, select the Publish cluster-specific logs to Amazon S3 check box. Replace the Amazon S3 location value with the Amazon S3 bucket you created, followed by /logs. For example, s3://DOC-EXAMPLE-BUCKET/logs. Adding /logs creates a new folder called ‘logs’ in your bucket, where Amazon EMR can copy the log files of your cluster.
7. Under Security configuration and permissions, choose your EC2 key pair. In the same section, select the Service role for Amazon EMR dropdown menu and choose EMR_DefaultRole. Then, select the IAM role for instance profile dropdown menu and choose EMR_EC2_DefaultRole.
8. Choose Create cluster to launch the cluster and open the cluster details page.
9. Find the cluster Status next to the cluster name. The status changes from Starting to Running to Waiting as Amazon EMR provisions the cluster. You may need to choose the refresh icon on the right or refresh your browser to see status updates.
Your cluster status changes to Waiting when the cluster is up, running, and ready to accept work. For more information about reading the cluster summary, see View cluster status and details. For information about cluster status, see Understanding the cluster lifecycle.
Step 2: Manage your Amazon EMR cluster
Submit work to Amazon EMR
After you launch a cluster, you can submit work to the running cluster to process and analyze data. You submit work to an Amazon EMR cluster as a step. A step is a unit of work made up of one or more actions. For example, you might submit a step to compute values, or to transfer and process data. You can submit steps when you create a cluster, or to a running cluster. In this part of the tutorial, you submit health_violations.py as a step to your running cluster. To learn more about steps, see Submit work to a cluster.
To submit a Spark application as a step with the console
1, Sign in to the AWS Management Console, and open the Amazon EMR console at https://console.aws.amazon.com/emr.
2. Under EMR on EC2 in the left navigation pane, choose Clusters, and then select the cluster where you want to submit work. The cluster state must be Waiting.
3. Choose the Steps tab, and then choose Add step.
4. Configure the step according to the following guidelines:
- For Type, choose Spark application. You should see additional fields for Deploy mode, Application location, and Spark-submit options.
- For Name, enter a new name. If you have many steps in a cluster, naming each step helps you keep track of them.
- For Deploy mode, leave the default value Cluster mode. For more information on Spark deployment modes, see Cluster mode overview in the Apache Spark documentation.
- For Application location, enter the location of your health_violations.py script in Amazon S3, such as s3://DOC-EXAMPLE-BUCKET/health_violations.py.
- Leave the Spark-submit options field empty. For more information on spark-submit options, see Launching applications with spark-submit.
- In the Arguments field, enter the following arguments and values:
–data_source s3://DOC-EXAMPLE-BUCKET/food_establishment_data.csv
–output_uri s3://DOC-EXAMPLE-BUCKET/myOutputFolder
Replace s3://DOC-EXAMPLE-BUCKET/food_establishment_data.csv with the S3 bucket URI of the input data you prepared in Prepare an application with input data for Amazon EMR.
Replace DOC-EXAMPLE-BUCKET with the name of the bucket that you created for this tutorial, and replace myOutputFolder with a name for your cluster output folder.
- For Action if step fails, accept the default option Continue. This way, if the step fails, the cluster continues to run.
5. Choose Add to submit the step. The step should appear in the console with a status of Pending.
6. Monitor the step status. It should change from Pending to Running to Completed. To refresh the status in the console, choose the refresh icon to the right of Filter. The script takes about one minute to run. When the status changes to Completed, the step has completed successfully.
For more information about the step lifecycle, see Running steps to process data.
View results
After a step runs successfully, you can view its output results in your Amazon S3 output folder.
To view the results of health_violations.py
1. Open the Amazon S3 console at https://console.aws.amazon.com/s3/.
2. Choose the Bucket name and then the output folder that you specified when you submitted the step. For example, DOC-EXAMPLE-BUCKET and then myOutputFolder.
3. Verify that the following items appear in your output folder:
- A small-sized object called _SUCCESS.
- A CSV file starting with the prefix part- that contains your results.
4. Choose the object with your results, then choose Download to save the results to your local file system.
5. Open the results in your editor of choice. The output file lists the top ten food establishments with the most red violations. The output file also shows the total number of red violations for each establishment.
The following is an example of health_violations.py results.
name, total_red_violations
SUBWAY, 322
T-MOBILE PARK, 315
WHOLE FOODS MARKET, 299
PCC COMMUNITY MARKETS, 251
TACO TIME, 240
MCDONALD’S, 177
THAI GINGER, 153
SAFEWAY INC #1508, 143
TAQUERIA EL RINCONSITO, 134
HIMITSU TERIYAKI, 128
For more information about Amazon EMR cluster output, see Configure an output location.
Step 3: Clean up your Amazon EMR resources
Terminate your cluster
Now that you’ve submitted work to your cluster and viewed the results of your PySpark application, you can terminate the cluster. Terminating a cluster stops all of the cluster’s associated Amazon EMR charges and Amazon EC2 instances.
When you terminate a cluster, Amazon EMR retains metadata about the cluster for two months at no charge. Archived metadata helps you clone the cluster for a new job or revisit the cluster configuration for reference purposes. Metadata does not include data that the cluster writes to S3, or data stored in HDFS on the cluster.
To terminate the cluster with the console
1. Sign in to the AWS Management Console, and open the Amazon EMR console at https://console.aws.amazon.com/emr.
2. Choose Clusters, and then choose the cluster you want to terminate.
3. Under the Actions dropdown menu, choose Terminate cluster.
4. Choose Terminate in the dialog box. Depending on the cluster configuration, termination may take 5 to 10 minutes. For more information on how to Amazon EMR clusters, see Terminate a cluster.
Delete S3 resources
To avoid additional charges, you should delete your Amazon S3 bucket. Deleting the bucket removes all of the Amazon S3 resources for this tutorial. Your bucket should contain:
- The PySpark script
- The input dataset
- Your output results folder
- Your log files folder
You might need to take extra steps to delete stored files if you saved your PySpark script or output in a different location.
To delete your bucket, follow the instructions in How do I delete an S3 bucket? in the Amazon Simple Storage Service User Guide.
Credit to: AWS Documentation