Before using AWS Shield Advanced, it is important to fully configure the service before a DDoS event occurs. Completing the configuration beforehand helps ensure that applications are protected and ready to respond effectively when an attack happens.
Understanding AWS Shield Advanced
AWS Shield Advanced provides additional DDoS protection capabilities beyond the default AWS Shield Standard service. It delivers advanced detection and mitigation mechanisms to protect applications against threats across:
- Layer 3 (Network Layer)
- Layer 4 (Transport Layer)
- Layer 7 (Application Layer)
In addition to attack mitigation, Shield Advanced offers:
- Automatic DDoS detection and response
- Visibility into attack metrics and traffic patterns
- Integration with AWS WAF
- Health-based detection using Route 53
- Access to the Shield Response Team (SRT)
How AWS Shield Advanced Improves DDoS Resiliency
DDoS Resilient Architecture for Web Applications
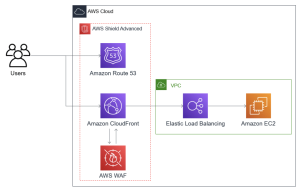
For web applications, AWS recommends placing Amazon Route 53, Amazon CloudFront, and AWS WAF in front of backend application resources. This architecture helps hide the application’s origin, deliver content closer to users, and filter malicious traffic before it reaches backend resources.
With Shield Advanced enabled, applications can benefit from:
- Protection against Layer 3 and Layer 4 DDoS attacks
- TCP SYN flood mitigation
- DNS attack protection through Route 53
- Protection against request flood attacks using AWS WAF rate-based rules
- Optional automatic application-layer mitigation and proactive engagement with the Shield Response Team (SRT)
DDoS Resilient Architecture for TCP and UDP Applications
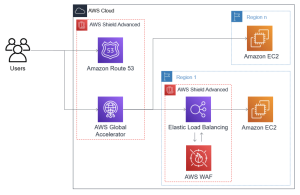
For TCP- and UDP-based applications such as gaming platforms, IoT systems, or services requiring static IP addresses, AWS recommends using Route 53 and AWS Global Accelerator.
This architecture provides:
- Protection against large-scale infrastructure attacks
- Better application availability
- Improved network performance and lower latency
- Optional web application protection through AWS WAF integration
Combining Shield Advanced with Other AWS Services
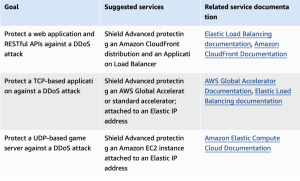
AWS Shield Advanced can provide stronger protection when integrated with additional AWS services depending on workload requirements. For example, web applications commonly integrate with CloudFront and Application Load Balancer, while TCP-based workloads can benefit from AWS Global Accelerator and Elastic IP addresses.
This combination enables broader security coverage and allows traffic filtering closer to AWS network boundaries during attack events.
How to Set Up AWS Shield Advanced
Step 1: Subscribe to AWS Shield Advanced
AWS Shield Advanced requires a paid subscription, unlike AWS Shield Standard which is automatically included for all AWS customers.
To subscribe:
- Sign in to the AWS Management Console.
- Open the AWS WAF & Shield console at https://console.aws.amazon.com/wafv2/
- In the AWS Shield navigation menu, select Getting Started.
- Click Subscribe to Shield Advanced.
- Read and accept all subscription terms.
- Click Subscribe to Shield Advanced to activate the service.
Important notes:
- Each AWS account that requires protection must be subscribed separately.
- For accounts under AWS Organizations, billing can be consolidated.
- Shield Advanced subscriptions do not automatically protect resources after activation.
Step 2: Add Resources to Protect
After subscribing, the next step is selecting the AWS resources that should be protected.
To add resources:
- Open the Protected Resources page.
- Select Add Resources to Protect.
- Choose:
- AWS Region
- Resource types
- Click Load Resources.
- Select the resources that need protection.
- Optionally add tags for easier management.
- Click Protect with Shield Advanced.
You can protect resources across multiple regions or select global resources depending on your architecture.
Step 3: Configure Layer 7 DDoS Protection Using AWS WAF
AWS Shield Advanced relies on AWS WAF to protect against application-layer attacks.
To configure Layer 7 protection:
- On the Configure Layer 7 DDoS Protection page, associate each resource with:
- an existing AWS WAF Web ACL, or
- create a new Web ACL
- Add a rate-based rule if one does not exist.
- Configure:
- request threshold
- desired action (Count or Block)
Rate-based rules help prevent request floods by limiting requests from suspicious IP addresses.
Optional: Enable Automatic Application Layer DDoS Mitigation.
When enabled, Shield Advanced:
- Monitors traffic behavior
- Compares current traffic with historical patterns
- Detects anomalies automatically
- Creates custom mitigation rules when attacks occur
Note: This feature only works with AWS WAF v2.
Step 4: Configure Health-Based Detection
Health checks help Shield Advanced improve detection accuracy and mitigation response.
To configure health-based detection:
- Create a health check in Amazon Route 53 if one does not already exist.
- Under Associated Health Check, select the health check ID.
- Verify that the health check accurately represents application health.
- Click Next.
- Health checks are also required if you want to use proactive engagement with the Shield Response Team (SRT).
Step 5: Configure Notifications and Alerts
AWS Shield Advanced allows integration with Amazon SNS to notify teams when attacks or abnormal activity occur.
To configure notifications:
- Select Amazon SNS topics for alerts.
- Decide whether:
- one SNS topic will be shared across all resources
- separate SNS topics will be used for different teams
- Continue to the next page.
This setup allows organizations to receive alerts immediately when suspicious activity is detected.
Step 6: Review and Finish Configuration
Before completing setup:
- Review all configuration settings.
- Modify settings if necessary using Edit.
- Click Finish Configuration.
After completion, the protected resources will appear in the Shield Advanced dashboard.
Step 7 (Optional): Configure Shield Response Team (SRT)
Organizations with Business Support or Enterprise Support plans can enable Shield Response Team assistance.
To enable SRT:
- Open the AWS Shield console.
- Navigate to Configure AWS SRT Support.
- Grant SRT access permissions.
- Add contact information.
- Enable proactive engagement.
With proactive engagement enabled, AWS can contact security teams directly if an attack impacts application health.